1. Introduction to Cherry Cheesecake Fluff
Cherry Cheesecake Fluff is a no-bake dessert that is as simple to make as it is delicious. It combines the creamy texture of cheesecake with the sweet-tart flavor of cherries and is guaranteed to satisfy anyone with a sweet tooth.
This dessert is perfect for potlucks, family gatherings, or any occasion where you need a quick and crowd-pleasing treat. The best part? It only takes about 10 minutes to prepare, with no baking required.
2. Why You’ll Love It
This dessert is easy, quick, and versatile, making it the ideal go-to when you need a last-minute dessert. It’s creamy, fruity, and fluffy all at once.
You can make it ahead of time and store it in the fridge until you’re ready to serve, making it perfect for busy days when you don’t have time to bake. It’s also a hit for feeding large groups, as it’s super easy to scale up if you’re serving more people.
3. Ingredients List
The ingredients for Cherry Cheesecake Fluff are simple and accessible, most of which you likely already have in your kitchen. You’ll need 8 oz of softened cream cheese, 1 cup of powdered sugar, 1 teaspoon of vanilla extract, an 8 oz tub of whipped topping, 1 can of cherry pie filling (21 oz), and a few optional ingredients to give the fluff extra flavor and texture.
4. Optional Ingredients
Though the basic recipe calls for only a few ingredients, there’s room for customization. Mini marshmallows, chopped nuts (like pecans or walnuts), and crushed pineapple can all be folded into the fluff.
These additions add flavor, texture, and extra visual appeal. If you’re feeling creative, you can experiment with different types of fruit, nuts, or even candy!
5. Equipment You’ll Need
Before you begin, gather a few key tools. You’ll need a large mixing bowl to combine all the ingredients, a hand mixer (or stand mixer) to beat the cream cheese, and a spatula to fold in the whipped topping and other ingredients gently. Make sure you have a bowl or serving dish ready to store and chill your finished fluff.
6. Step 1: Beat the Cream Cheese
The first step is to soften the cream cheese. It’s important to use room-temperature cream cheese to achieve that smooth and fluffy texture. Once it’s softened, place it in your large mixing bowl.
Use a hand mixer or a stand mixer to beat the cream cheese until it’s completely smooth, with no lumps. This creates a nice creamy base for the rest of the ingredients.
7. Step 2: Add the Powdered Sugar and Vanilla
Next, you’ll add 1 cup of powdered sugar and 1 teaspoon of vanilla extract to the cream cheese. The powdered sugar sweetens the fluff, and the vanilla extract adds a subtle, warm flavor. Mix everything together until fully combined, making sure the sugar dissolves into the cream cheese mixture.
8. Step 3: Fold in the Whipped Topping
Now, it’s time to fold in the whipped topping. Whipped topping is what gives this dessert its light, airy texture. Add the thawed whipped topping to the cream cheese mixture and gently fold it in using a spatula. This step is crucial to maintaining the fluffiness of the dessert, so fold carefully rather than stirring vigorously.
9. Step 4: Add the Cherry Pie Filling
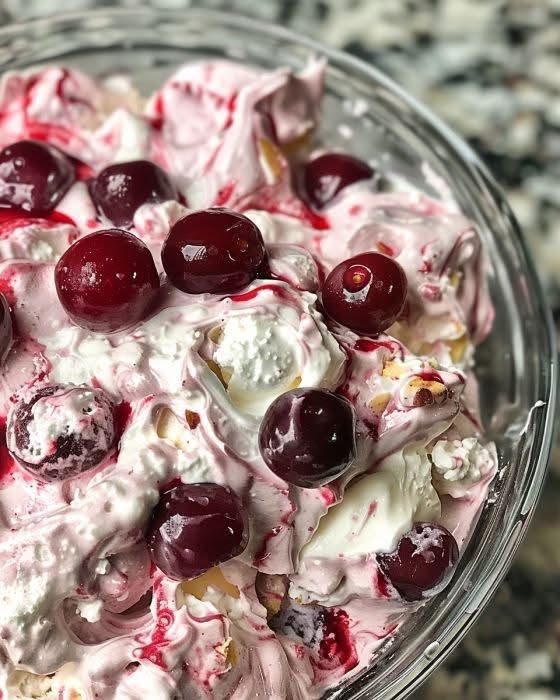
The cherry pie filling is what makes this dessert uniquely “Cherry Cheesecake.” Open your can of cherry pie filling and pour it into the bowl with the cream cheese mixture. Gently fold the filling into the mixture. You want to swirl it through the fluff without overmixing, so there are still beautiful streaks of the red filling in the white cream cheese base.
10. Step 5: Add Optional Ingredients
At this stage, you can customize your fluff by adding some of the optional ingredients. If you’re using mini marshmallows, chopped nuts, or crushed pineapple, fold them in gently. These add-ins give the fluff additional texture and flavor. For a tropical twist, you could add pineapple and marshmallows, or for extra crunch, go with nuts.
11. Step 6: Chill the Dessert
Once everything is mixed together, it’s time to refrigerate the fluff. For the best results, chill the dessert for at least 1 hour before serving. This allows the flavors to meld together and helps the fluff set up. Make sure to cover the bowl or transfer the fluff to an airtight container to prevent it from absorbing any odors in the fridge.
12. Step 7: Serving the Fluff
After chilling, the Cherry Cheesecake Fluff is ready to serve. It’s best served cold, so keep it refrigerated until you’re ready to dish it out. You can serve it in individual bowls or cups for easy portioning, or serve it in a large dish for people to scoop their own portions. For added flair, you can top each serving with a whole cherry or a dollop of extra whipped topping.
13. Serving Suggestions
While this dessert is delicious on its own, you can make it even more exciting by serving it parfait-style. Layer the fluff in jars or glasses, alternating between the creamy mixture and crushed graham crackers for a mini cheesecake vibe. This adds a delightful crunch and makes the dessert look even more elegant.
14. Tips for Making Cherry Cheesecake Fluff
To make sure your fluff turns out perfectly, here are some helpful tips: Ensure the cream cheese is softened before you start mixing. Don’t overmix when adding the cherry pie filling, as you want those beautiful red streaks. If you’re using the optional ingredients, be sure to drain any canned fruit (like the pineapple) to prevent excess moisture in the fluff.
15. Variations to Try
Cherry Cheesecake Fluff is versatile, so don’t be afraid to get creative! If cherries aren’t your favorite, you can switch to other fruit pie fillings, like blueberry, strawberry, or raspberry. For a more tropical flavor, try adding mandarin oranges or drained crushed pineapple. You can also swap in different nuts or add mini chocolate chips for a bit of indulgence.
16. Lighter Version
If you’re looking to make a lighter version of this dessert, there are easy swaps you can make. Use light cream cheese and sugar-free whipped topping instead of the full-fat versions. You can also reduce the amount of powdered sugar to cut down on sweetness and calories. While the texture might be slightly different, the flavor will still be just as delicious.
17. Storing Cherry Cheesecake Fluff
Cherry Cheesecake Fluff can be stored in the refrigerator for up to 3 days. Keep it in an airtight container to preserve its freshness. It’s best to eat it within a few days to enjoy the fluffy texture at its best. If you need to store leftovers, make sure they’re well covered so the fluff doesn’t dry out or absorb odors from other foods in the fridge.
18. Freezing Not Recommended
While this dessert is perfect for making ahead and storing in the fridge, freezing it is not recommended. Freezing will cause the texture to change, and the fluff may become watery once thawed. If you have leftovers, it’s better to keep them in the refrigerator rather than freezing.
19. Why This Recipe Works
The beauty of Cherry Cheesecake Fluff lies in its simplicity. It’s made with just a handful of ingredients, yet it delivers on both flavor and texture. The combination of cream cheese, whipped topping, and fruit creates a dessert that’s creamy, fluffy, and satisfying. The cherry pie filling adds a sweet and tangy element that balances out the richness of the cream cheese.
20. Final Thoughts
This Cherry Cheesecake Fluff is a perfect dessert for anyone looking for a quick and easy treat that doesn’t require baking. Whether you’re hosting a party, going to a potluck, or just craving something sweet, this dessert is sure to be a crowd-pleaser. With its creamy texture, fruity flavors, and easy preparation, it’s a must-try for anyone with a love for cheesecake or no-bake treats. Enjoy!
-

Crispy Parmesan Zucchini Potato Muffins
Why You’ll Love This Recipe Crispy & Cheesy : The Parmesan topping creates a golden, crunchy crust that’s utterly addictive. Savory & Satisfying : Packed with zucchini, potatoes, and herbs … Read more
-

Blueberry Crumble Muffins
Certainly! Here is your recipe extended into 20 paragraphs: Introduction Imagine waking up to the comforting aroma of freshly baked goods wafting through your home. There’s something undeniably magical about … Read more
-

Better than bread, bread substitute with 3 ingredients prepared
Why You’ll Love This Recipe Quick & Easy : Ready in under 10 minutes with minimal prep and no fancy equipment. Low-Carb & Keto-Friendly : Perfect for those following a … Read more